
John Milner sadly passed away in Febuary 2013.
Was still giving his all to life and taking up new challenges at 78 yrs!
Was still giving his all to life and taking up new challenges at 78 yrs!
A class in drawing for beginners / 8 Sessions
Session 1 – Blind contour drawing / Contour drawing with minimal eye contact to the paper.

|

|

|

|
|
Follow every twisting and turning of angle with careful eye (as if tracing with your finger) the lines that can be seen in the object you want to draw. We used rocks and bricks but anything with a linear aspect will do. Respond with pencil on paper following the eyes pathway around the contour lines of the form. It's about looking and exploring to attain a feeling for form. Take your time; battle the impatience!
It doesn't matter what happens on the paper. The exercise itself is beneficial. Try increasing and decreasing pressure on the pencil in response to the type of line you are observing and, be very patient. This is one of many helpful approaches recommended by Nicolaides in his book: 'The Natural Way to draw' Session 2 – Measuring |

|

|
|
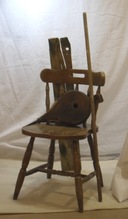
A selection of different utensils provided the set-up for a helpful session on how to measure in drawing.
Imagine holding a transparent ruler to the things you've decided to draw (only we use a pencil instead and approximate rather than to be exact). Each time it's used it must be at the same distance between the eye and the object/s. Seen through the ruler a fairly large object (e.g a bottle) at some feet away may line up with its top and bottom against your ruler at only 3cm. As you move the ruler across, or up, or down, other objects or distances (between useful points for example) may be seen in relation to this size. Remember to keep the pencil at the same distance from you each time you measure. Arm outstretched with the elbow locked is the best way to attain consistency in measuring. It's also advisable to restrict measuring to the vertical and horizontal planes. Measuring is really helpful in the early stages of a drawing to develop a structure or sound framework from which to build. It can be used later on in drawing to double check the eyes guess. Session 3 – Angles |
|

|

|
|
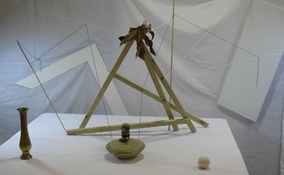
Wood and string providing a dynamic set up for a class on drawing Angles.
It's been said that incorrectly perceived angles in the early stages of a drawing is often one main reason why things go awry. Our perception to what degree an angle is obtuse or acute is more accurately discerned against a true horizontal or true vertical. The pencil, or viewfinder can be used if nothing is present in the subject matter itself (which should always be scanned for these factors first). A knitting needle is also useful held from the finger tips with the weight at the bottom acting as a sort of plumb line for the vertical. Session 4 – Negative space |
|
|


|
It's
not really negative! That's just a useful way of describing it
relative to the space filled by the object/s.
Imagine a photograph of the thing you want to draw. Cut out the image of the chosen object/s. Place the photo on white paper. Now the object is only a flat shape and the other shapes within the photo (the background etc.. ) are brought to life. These shapes in drawing are as important to correctly observe as the shape of the thing itself and the chances are that you will not do a good job of drawing the thing itself if you haven't approached it by way of observing and drawing the shapes around it. What's needed in drawing is a holistic view of everything within the frame of the chosen composition. |